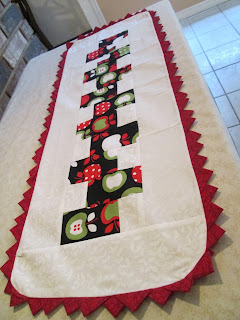
I love prairie points. They are not the easiest thing to do, but they are cute. I've really wanted to do them for awhile now. I'm not going to lie, I was scared. I mean, they look scary. They weren't the hardest thing I've sewn. They give it a big bag of awesomeness.
I saw this pattern in a magazine on a quilt border, and decided to give it a go. The concept is simple. I just made my own cuts.
- Apple fabric cut 4" from long width of fabric. *you can cut the strips from any size. you just may have to make multiple cuts.
- White fabric cut 2" from 44 wide fabric.
- Borders-White fabric strip that is 6 1/2" x 40"
- Prairie points were made with 1"points via this tutorial.
Once your two strips are cut at 2" for the white and 4" for the other fabric. I laid the right sides together along one side and sewed the length of the fabric.
Press open towards the dark fabric. *made me think of star wars. I'm a total geek.
Square up the fabric ends.
I folded the fabric to make double cuts at 2 1/2". I cut 12 for this topper.
Make sure that each fabric is in this position when sewing your sets together.
Here's all my sets that were chain pieced.
I pressed my sets open and separated them.
Make sure the sets are facing the right way right sides together.
These are sewn together. Now, add one to the other two to make one long piece.
These are sewn together. Now, add one to the other two to make one long piece.
This is my 40" long strip that's 6 1/2" wide, cut it at 3 1/4".
I know the white it too long, but it's fine. We are going to use the leftovers.
Just square up the border like this here. You are going to take the leftover that you just cut off.
Once you have lined it up on one end, you will cut where the short piece ends. This will make it the same size as the other one. Set those aside small pieces aside for the top and bottom.
Now, both borders are on the sides. I love the look here with the apples.
I took the remaining strip and sewed them on and squared it up. I took the leftovers and laid it on the other white piece for the last border trimmed it and sewed it. Just like I demonstrated earlier.
I had to take a pic of the pinning job here. I haven't used this many pins in forever. I really worked out. I loved the tutorial, but she didn't show how to attach it to a quilt or anything. So, I used an 1/8" around the edge of the top here.
This is how it looks. Amazing!
I have the sandwich going here: top facing down and prairie points facing in, bottom right side up, and batting underneath. I sewed this 1/4" around leaving the side open 6" for turning.
I hope you enjoyed this adventure with me. It was an exciting one for me. I think it's cute as can be and everything should have prairie points from now on and forever. Hahaha. ;) Just kidding. Half of forever. Blog at ya later.


No comments
Post a Comment