June 26, 2013

A Little Paper Piecing

    
It's very obvious that I love coffee. So, it only makes sense to paper piece a coffee mug rug or coaster. This paper piecing thing is really fun. It's different. Overall, I think I like it.

It 6 inches finished. So, I think it's an oversized coaster. I picked it up from craftsy.com under the free patterns from this blog. It comes in different sizes too.


I like how the quilting came out. I like the modern lines and the piecing gives it an edge.


  The hardest part of paper piecing is getting the fabric to cover the space you are sewing. The angles can really mess me up.  I did try the mariner's compass (also on craftsy.com), and it was a fail. A three time fail. Wow, all time record for me. I will get it. My hubby said maybe he could help with the labeling it or something. I could always get some help from my mother-in-law. So, I'll get it. I must just be having a slow moment today.

 
This was a little contoured burp cloth. Pattern is here. Both sides are flannel.

 
A little matchy matchy for a friend's baby shower gift. She loved it. This is a yard of two different fabrics sewn together and topstitched. It's sewn in rows about every 6 inches to keep it from slipping. I tell ya, flannel is not my favorite to sew. It is stretchy. One tip to keep any fabric from slipping is give it a good starch.
 
 
Here's some photos of our little family.
 
This is my son, Jared, catching some rays at the Pensacola Beach on Mother's Day. We actually live  here. It's like we are on permanent vacation. You would think we would all have better tans. Haha.
 
 
My daughter, Kenzie and her cousin, playing in the water. I tried to crop these photos and post them, but it wouldn't let me upload them cropped onto blogger. I have no idea why. I am not a technical blogger at all.
 
On that note, I was excited that I added a couple buttons and a widget. I figured out, finally, how to add all the blogs I follow too. I did it with the help from some other blog tutorials. While I was making leaps and bounds I changed the look too. Woohoo!
 
 
We went to the blueberry patch for some picking. We did get a thunderstorm and had to wait it out under a overhang of a barn. It was just part of the adventure.


Look at those blueberries. I can taste the pie I made right now.

 
She is too cute.

 
We're in one of those learning to smile stages. Still cute. The most awesome blueberry pie recipe is here. The only thing that I did different was 4 Tbsp. of cornstarch. The instructions said that the 3 wasn't enough. It was great. It just takes about 2 hours to set.
 
 
This is one of me. I'm not at the sewing table. I was just about to go to dinner with a friend.  Just a few photos of what life is like around here. Let me add one of my hubby.
 
 
Here's my handsome guys at my son's pre-k graduation about a month ago.
I had to represent everyone. Now, I'm off to cook dinner. Blog at ya later.


June 22, 2013

Updating to Bloglovin

  <a href="http://www.bloglovin.com/blog/8245929/?claim=54b6umf6t3p">Follow my blog with Bloglovin</a>

                             This was just for claiming my blog on bloglovin.

June 21, 2013

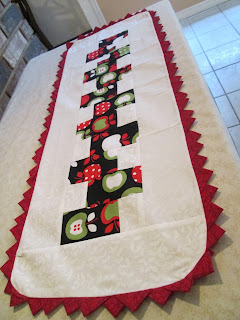
Table Topper wth Prairie Points


 I love prairie points. They are not the easiest thing to do, but they are cute. I've really wanted to do them for awhile now. I'm not going to lie, I was scared. I mean, they look scary. They weren't the hardest thing I've sewn. They give it a big bag of awesomeness.
 
I saw this pattern in a magazine on a quilt border, and decided to give it a go. The concept is simple. I just made my own cuts.
  • Apple fabric cut 4" from long width of fabric. *you can cut the strips from any size. you just may have to make multiple cuts.
  • White fabric cut 2" from 44 wide fabric.
  • Borders-White fabric strip that is 6 1/2" x 40"
  • Prairie points were made with 1"points  via this tutorial
 
 
Once your two strips are cut at 2" for the white and 4" for the other fabric. I laid the right sides together along one side and sewed the length of the fabric.
 

 Press open towards the dark fabric. *made me think of star wars. I'm a total geek.
 
 
Square up the fabric ends.

 
I folded the fabric to make double cuts at 2 1/2". I cut 12 for this topper.

 
Make sure that each fabric is in this position when sewing your sets together.

 
Here's all my sets that were chain pieced.
 

I pressed my sets open and separated them.


Make sure the sets are facing the right way right sides together.
These are sewn together. Now, add  one to the other two to make one long piece.


This is my 40" long  strip that's 6 1/2" wide, cut it at 3 1/4".

 
I know the white it too long, but it's fine. We are going to use the leftovers.

 
Just square up the border like this here. You are going to take the leftover that you just cut off.
 
 
Once you have lined it up on one end, you will cut where the short piece ends. This will make it the same size as the other one. Set those aside small pieces aside for the top and bottom.


Now, both borders are on the sides. I love the look here with the apples.


I took the remaining strip and sewed them on and squared it up. I took the leftovers and laid it on the other white piece for the last border trimmed it and sewed it. Just like I demonstrated earlier.


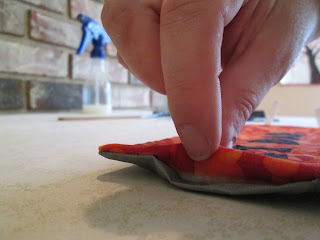
I had to take a pic of the pinning job here. I haven't used this many pins in forever. I really worked out. I loved the tutorial, but she didn't show how to attach it to a quilt or anything. So, I used an 1/8" around the edge of the top here.


This is how it looks. Amazing!

 
I have the sandwich going here: top facing down and prairie points facing in, bottom right side up, and batting underneath. I sewed this 1/4" around leaving the side open 6" for turning.


I hope you enjoyed this adventure with me. It was an exciting one for me. I think it's cute as can be and everything should have prairie points from now on and forever. Hahaha. ;) Just kidding. Half of forever. Blog at ya later.


June 17, 2013

Koozie Tutorial


Doesn't everyone need a koozie? My hubby loves them.  So, Happy Father's Day. You are the best dad, and you help keep me sane. I love you! I hunted for a koozie tutorial or pattern, and  I couldn't find one I liked.  So, it was up to my own brain and a dash of help from a friend for the design. 


You'll need:
    1 fat quarter or scrap of fabric. The inner lining can be the shiny silver insulbright.
    Small bit of cotton batting
    1/4 inch elastic or use whatever size you have on hand.
    Thread to match, scissors or rotary cutter, and sewing machine.

I cut the outer fabric, inner lining, and batting at 4 1/4 x 8 1/2 inches
I cut 2  pieces of 1/4 inch elastic at 2 inches
Heat Bond for applique if needed

 
This is the shiny side of the Heat Bond that I iron to the fabric per instructions on Heat Bond.

 
I am going to iron this down onto fabric. It will stick to it. Then, I will cut out the design.
 
 
Once you have cut out the design. You will peel off the paper like a sticker and place these on the fabic where you want them appliqued and iron. It will stick to the fabric. Heat Bond is one of my favorite things. I thought this would be scary, but it isn't. It makes cutting small pieces very easy.


I want the batting, then outer fabric right side up (meaning-you can see the pattern on the fabric). I put the two pieces of elastic on one the right side of the fabric about 1 inch away from the top and bottom. Pin the elastic down..  The last layer is the backing. Place it wrong side up.


Pin it. I just keep it all lined up. Take it over the the sewing machine and sew around the outside. You will want to go over the elastic a couple times for security.


It nice with this thread. You can see what it looks like. I left about a 3 inch opening on the opposite end of the elastic. Back stitching on each side of the opening.


I trimmed the edges and the corners for better turning.

 
This is turned.
 
 
Before I get to the elastic, I am going to topstitch around the edge and leave the left side open for the elastic. I used the matching thread here.

 
I tucked the fabric on the open end here.

 
  I am going to slip in the elastic about 1/2 inch.


I am going to wrap the elastic to the back and pin it.  Now, when I stitch the side together, the elastic will be sewn to the under side. This is the only way that I found that I didn't have to fight with it.
 
Now, when I stitch the side together, the elastic will be sewn to the under side. This is the only way that I found that I didn't have to fight with it. After thought, I could've just pinned them regular and used the arm sleeve on my machine. My machine is sunk down. So, this is just as good.


Here's another look before I sew it. I am going to go over the  elastic and sew it.
 
 
It's not the neatest but no one is going to be looking at that part. Haha. Now, it's time for a cold drink. I hope you liked this one. Pretty easy peasy. Blog at ya later.


© Quilty Dream
Maira Gall