January 29, 2016

Color Play Friday-Link Up

Hi there, and welcome by my little blog. I have just had a jam packed week. Does it ever feel like that to all of you? Trying to get everything done is very time consuming.  This year I am trying to focus on one thing at a time. It has been really hard to accomplish that. Especially when it feels like I have ADD all the time. I started working on the layout for this Color Pay Friday earlier this week. So, it will be ready to post bright and early on Friday.

I am linking up with #Colorplayfriday. This week, the picture is a wonderful seafood dinner plate. It was a little harder for me than last week, and I am still only picking 5 fabrics. It's the minimum until I am feeling more confident. Living on the Gulf Coast, I love this plate of food. Mud bugs (crawfish) are a real summer time hit here. It makes me think of summer. We normally have this menu at Easter with the family. Maybe, I can take a quick pic when we get together for Easter.


I found that with this picture,  I knew exactly what would work once I hit the reds. I just decided to take it on to the finish line with the Grove in Charcoal. I love Alison  Glass fabrics. I guess, I will lean on what I know. The marigold on top there was a new one. I love the circles though. The pop of orange is a nice touch. 

I am linking up with all the lovely ladies below and the hostesses Trina and Lorinda.  If you want to go over and see how to play. It is pretty easy and fun.   I am on my way to see what everyone else's palette. I love a good surprise. 
 
 Trina Inanotterlife

Have a quilty day.
Yvonne


January 27, 2016

Low Volume Fabric

I gave a talk about low volumes  at our guild. We discussed all the different types of low volume and how to determine whether a fabric is low volume. The definition of low volume is as fabrics that “read” as white or light fabrics but at the same time have a secondary pattern or design. So, when you are looking far away. They look like one solid color.


Recently, low volume has been updated to have a "neutral" background. The popular cotton and steel have a creamy grey background and work well as low volume.


 .

There's two main kinds of low volumes Muted and Pop Low Volume. You can find in depth blog post here with the  The Elven Garden. She also goes into color value as well which is very helpful in determining  if your fabrics are low volume.
You can see the use of muted or 'whispering" low volumes. Some of these even have a bit of color, but they still whisper and fade away into the background. They are soft colors. The color and secondary pattern really do fade away when seen from a distance or even up close. These would add a subtle hint of texture while giving the quilt an overall soft feeling. As you can also see, there are white, cream, and grey backgrounds which all give a variety of texture as well.


 Low Volume can be multicolored, but most involvement of color are added in small doses of one or two colors.  If these are a background color palette for your quilt, you would need bright or saturated colors to help these low volumes stand out.

 Techniques you can use for determining low volume is look in the wrong side of binoculars. The second is just standing back a several feet from your design wall. Squinting can be helpful. Take a black and white photo. If it stands out in the photo too much, you can just remove it from your overall palette.

Deciding which low volumes to use will depend on the texture that you are looking for  in your quilt. The beautiful thing is that it is completely up to you what you want it to look like.   Most of the time, low volumes are used as background to give the quilt interest. However,  low volumes can be used for the whole quilt. As always, there's no wrong or right way to use these fabrics. The choices and placement are up to you. That is what is so exciting about quilting, Each quilter's interpretation is what makes quilting a work of art.  There's another blog post that has some wonderful pictures of low volume fabrics on Craftsy . You can also find tons oflow volume inspiration in this Flickr Group.

I hope this is helpful in your quest of what is a low volume. 
Happy sewing and thanks for stopping by. 
Yvonne 

January 22, 2016

Color Play Friday-Finish

Hi there, and thanks for stopping by my little slice of heaven.  This week I accomplished a ton of stuff. I will be sharing some real awesomeness with you soon.  I have been really involved on Periscope. So, I have done some live updates as they are happening. It has been such a wonderful platform. You can be right in your own living room and watching other people's scope  about quilting, planning, and diy. It is almost like youtube, but people can comment back to you if you are doing or watching a  live scope. You should check it out. I have seen Lorinda post a scope about #Colorplayfriday. I thought,  why not? Of course I should decide to try it out on a Thursday, in my sarcastic voice...LOL. I am a little late to the party, but I feel like I should play because both of these ladies helped me so much!

Lorinda blogs here at Laurel poppy and pine, and  Trina is over here at In An Otter Life both made some periscopes to show how to use different platforms to  make the neater version of the image below #Colorplayfriday. Which is really fun. They both have all the rules and how to play on their blog. So, pop on over there and check them out.


   This is my disclaimer. So, no judging. :)
 As a newbie, I did the minimum amount of colors that you can use.

I went to Gimp.com and downloaded the app that Lorinda uses. It is free and seems like a really intricate way to manipulate photos. I just need a good 3 days to figure it out.  Trina uses google drive, but I was so invested in trying to use gimp. I am quite stubborn and nothing can stop me when I am on a mission. And hey, I was wearing my quiltcon shirt, and that means things are going to happen.

You two are just awesome for trying to help me!

Second disclaimer, I had a pretty hard time making the fabrics fit in their little boxes. Also, while I am judging it, It could really use a pop of color.
 
Credit from left to right with a link to purchase.

 I love some Carolyn Friedlander, and these are just perfect.
 
 
Others linked up with Color Play Friday
Stop by and see their pretty palettes
 Mindy Quilting Mayhem 


So, a little late to the party and a bit messy. Life is just crazy sometimes, and you should just have a little fun! You never know what will happen. I am heading out to do my mommy duty errands today. I hope you have a great weekend or week which ever it is for you. See you all next week. Thanks for stopping by.

Happy Sewing
Yvonne

January 14, 2016

Easy Clutch

Did you catch the new logo in the header? How do you like it? Leave me a note and let me know what you think. I would love to hear from you.
 
I am still loving pictures as tutorials. I made up a whole pdf file, but this is just the way that I like a pattern. Maybe, I can just put in the link for the people that would like to print it out in the future. This shouldn't take long at all to whip up.
 

A tutorial


To start you will need:
 
  • 808 craft fuse or medium interfacing that is fusible.
  • Shapeflex 101 or lightweight interfacing
  • 1 Exterior Fabric A fat quarter will work
  • 1 Lining A fat quarter will work that coordinates
  • 1 magnetic snap
  • 1 Small circular object. I used a dessert plate.
  • A marking pencil
 
Before we start, I thought I would briefly cover some tips. When working with any fusible interfacings, you would want to turn off the steam on your iron. It took me a while to figure that out. Also, the SF101 or lightweight interfacings seems easy to fuse.  The craft fuse 808 takes a bit longer to heat and fuse.


Cut Exterior, Lining and 2 of each interfacing at 12.5" x9.5" Cut 2 2"x2" pieces of 808 craft fuse for the snap.
 
 
Now, you take the SF 101 or lightweight fabric and fuse is the wrong side of both Exterior and lining. Next, fuse the Craft Fuse 808 shiny side down and iron right on top of the SF101.
 
Now for the fun stuff!

Magnetic snap. I have put my fabrics wrong sides together as if they are already sewn.  I have folded the bottom up 4 1/2 inches. I have folded the top down of the lining 2 3/4" for snap placement. I have came in one inch from the edge and 4 1/2 inches from the side and mark for snap if you are doing a 1/2" seam allowance around the outside.

 
I placed a 2"x2" piece of craftfuse down, and remarked measurement. I cut two very small slits with a craft knife. This can be done with scissors, but you will need to be careful that the whole is not too big or you will see it. It just needs to be big enough for the prongs of the snap to go through the fabric.
 
 
Here's the snap on the lining side of the fabric.

 
This is what it looks on the back.  You will need to slide the round piece on that come in the package with the slots. This piece and the interfacing help stabilize the snap.

 
Now that this snap is in place, I am going to press it down where I would like the pouch to close. This can give you some wiggle room on the placement and fold of the clutch making the clutch deeper or shallow as you like it.
   Place the other 2"x 2"  interfacting on the back side and center where the mark corresponds on the front. Cut two  slits about 1/4' apart like before and put the round piece on to secure.
 
 
This is what it should be looking like at this point.
 
 
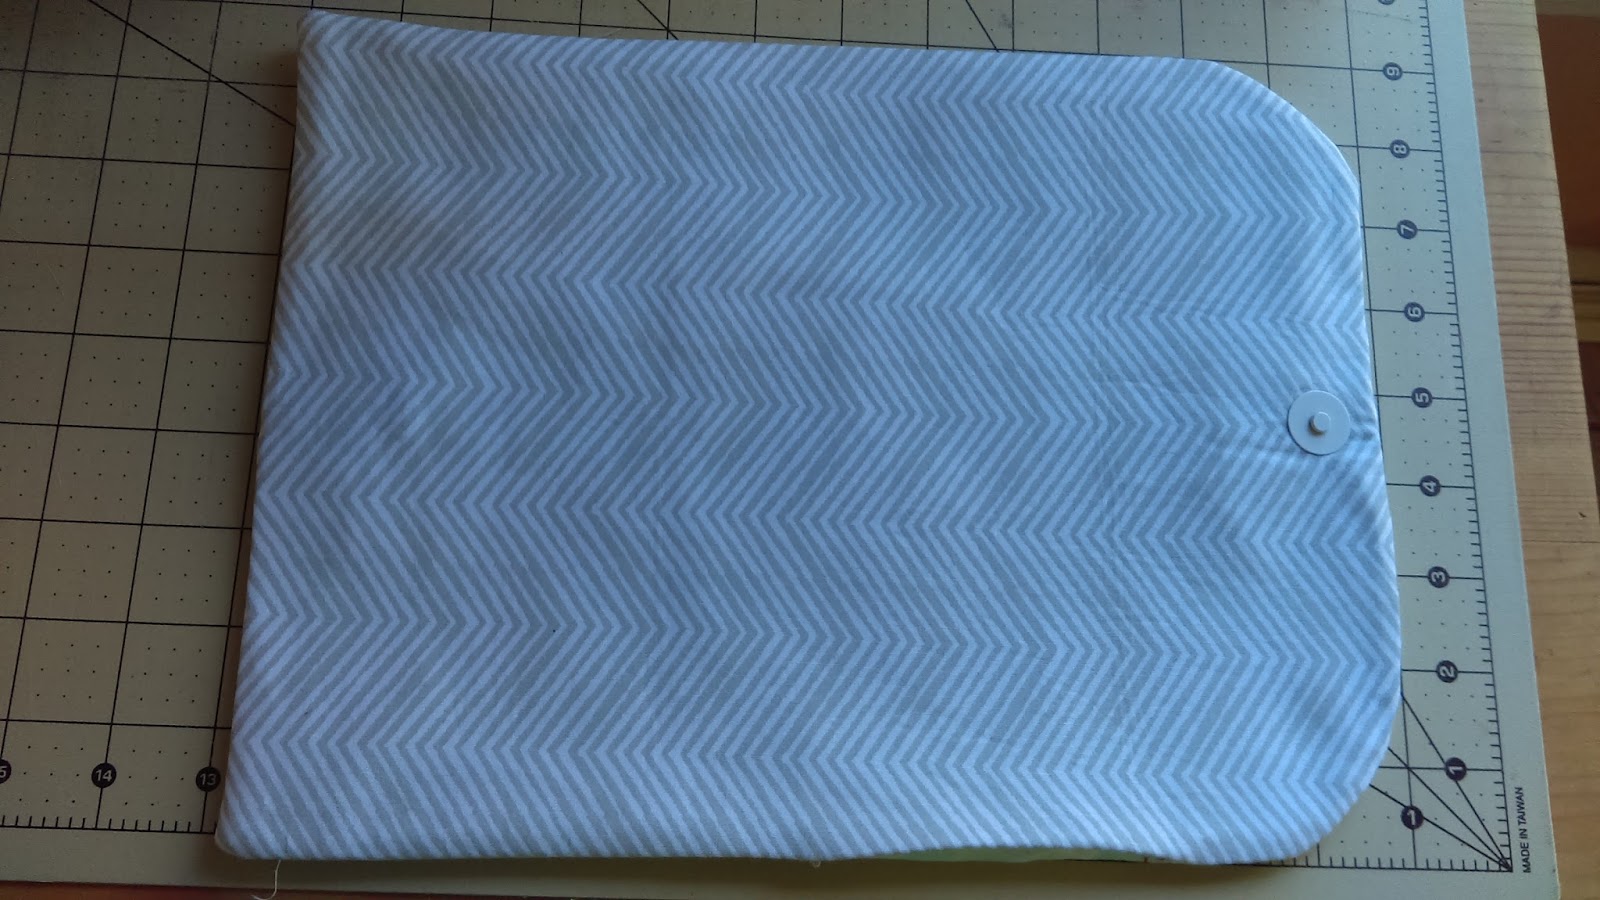
Now, you will take the top and bottom and put them right sides together. The snaps should be on opposite ends. We are going to mark the curve.
(If you would like a square clutch, you can skip this step.)
 
I have my corners of fabrics lined up on the mat below. I have set a dessert plate at the two inch mark on either side for the corner of the interfacing. I marked with a pencil. Do this on the other top corner to make the curve on the clutch flap.


This is how it should look. Now, trim off the corners on the pencil line.

 
Once that is complete, you will sew  1/2" seam allowance around  leaving a 3 1/2" opening in the side of the clutch for turning. Backstitch before and after your opening.  Remember to take your time  on the curve.  I have clipped the corners. Remember not to trim to close and snip you thread.
 
Now, you will turn it right side out. Poke out the corners with a chopstick or turning tool. Making sure not to punch through the fabric while poking out corners.
 I used to do this all the time.
This is nice and turned. Press and get some wrinkles out. You can naturally fold the opening and press.Also, make sure that you have a nice matching topstitching thread for the exterior and interior.  
 
 
My topstitching still needs work. I usually go for an 1/8" around the outside of the exxterior. This will close the turning hole as well. Now, you will turn this over and fold up the bottom about 4 1/4" and make sure that the placement is good for the snap. You can crease the bottom of the fold and pin.
 
 ****If you want to add a strap. You could at this step. I will modify at a later time. I just wanted to stitch this up quickly. ****
 
Sew from the bottom to the top of the pocket that you have created on the outside right over the topstitching or make a second line if you like. Backstitch at beginning and end on both sides.
 
 
 .
 
 Here's a side view. This has been stitched, but it will look like this when you fold up the bottom to make the pocket. It is a nice stream lined accessory. It only took about an hour with photo breaks.


 You are ready to go. Throw your keys, phone, and a little wallet in side. It is good for coupons.  I will modify for this step. You could, in a pinch, do Velcro if you like.

 
A quick and easy clutch for everyday or special occasions.
I hope you found this tutorial helpful. You can modify it easily. You could do patchwork, quilt as you go. I added a Hedgehog to the last one. I just centered the paper piecing at the top and added fabric to the side.
 
Happy sewing! Thanks for stopping by.


January 13, 2016

Finish-A-Long Q1 2016

     Hi everybody! Welcome to 2016 and my little blog. I just did a little revamp around here. I hope that you like it. I have been neglecting my little space for quite some time. While others stuck it out, I almost vanished from the blogging universe. I have missed it so much. Life has been crazy to say the least. So, I have a plan to scale back a little and get back to my roots. It's time to flourish. I hope you will stick around for the journey.

 I am going to make big goals and reach for them.   

I am thinking about switching over to make a Quilty Dream blog. That is what the name is on everything else. For now, I wanted to get in on the FAL Quarter 1. I definitely have some wips going on in this room. So, it is about time to make some quilts. Who's with me?

Wonderful WIPS 

There's several places to link up and you can find the info here.
 
 Hemishperes- Seriously, this is a few years old. This one has been moved from the design wall, to the drawer, and to a cabinet. Until the other day, I thought I had really lost it.*** Seriously!** Nope, it is still here, and it is going back on the list. It is supposed to be lap size. The pattern is from City Stitches blog here.


This is another oldie but goodie. I love these AMH pluses.  So what is the problem? I have no idea at this point. I am just going to look at this as an opportunity. This is supposed to be an epic AMH queen quilt. These blocks are 6 inches finished. I have 50 more cut to sew. It is back up on the design wall. I just took it out of timeout. I was hoping it would inspire me...not yet. ::sigh::
 
 
This beauty is 2015 Bee Hive Swarm that the lovely Alyce hosted over here. She has tons of beautiful block tutorials. This one is just begging to be made.
This will be a lap size quilt.
 
This is my 2014 Bee Quilt. This is also in my drawer of wips. I am ready to get this one done too. It came from the book 13 quilts with friends. It is called Ziggy Stardust. I believe I will make it a twin for my daughter. She will love that.


     This is from the #BClogcabinswap on Instagram. I have these trimmed and ready to piece. I even decided on a backing. However, I feel that it is wrong to put this together. Why, well this is the most recent quilt that is ready. I may do one of the others quilts first, just to feel better about finishing this one early. I know this must seem silly, but totally true.

I love everything about these blocks.


These are the blocks that I won in the PensacolaMQG Block Lottery. Well, they were gifted to me. I can't win another block lottery until they become a top of something. I am thinking table runner.  These are blocks using the Sidekick ruler by Jaybird Quilts.


 Last one is a screenshot of the Rainbow mini quilt swap that I am have laid out. The pattern is from Love Quilting Magazine. It is called Elegant Esme by Lynne Goodman.  
 
 
Here's some drunkard's path that I am working on Shades of Black. I had no business starting, but I did and here they are on this list. This will be a mini.


This is from the book 13 quilts with friends. I cut these wrong, but I though I would make a mini and quilt it. This one is just for fun. I love these colors. I am thinking about a scrappy quilt with these.


There are plenty more projects that I would like to do, but I am going to stop here. I hope to bust through this list.
 
 
I just wanted to end this post with some encouraging words.
Happy Sewing!
© Quilty Dream
Maira Gall